Thursday 30 July 2009

Tuesday 28 July 2009

Recipe - Aussie Hot Dog Sandwich


Anyone who has been to Australia should have sampled the great Aussie Burger. It's a great show of excess and will not fail in making you feel well and truly full.

The thing that categorises a Aussie burger, at least to me, are three main ingredients. Beetroot, pineapple and a fried egg. All the major hamburger chains down under have a Aussie Burger on their menu as well.

If you ever go to Australia, this is one to try.

Since there are literally thousands of Aussie Burger recipes floating around the t'Interweb I thought I'd do something a bit different - The Aussie Hot Dog Sandwich.

Let's just say that it turned out to be quite a monster. Definitively nothing you should try if you are a child, pregnant or generally a sissy.

I'm sure that I would have found a Health & Safety warning sticker somewhere on it if I just had looked properly.

Enough waffling, let's see how to create one of these monsters...

Ingredients (makes one ginormous sandwich)
1 ciabatta, cut to the length of the hot dogs
Yellow mustard, preferably French's
Sliced beetroot
2 hot dogs, cooked and sliced in half
2 pineapple rings
2 slices of tomato
2 fried eggs
4 rashers of streaky bacon, cooked
Grated, or slices of, cheese

Method
Slice the ciabatta lengthways. Put generous amounts of mustard on the bottom half of ciabatta. Then layer in the following order: Beetroot, hot dogs, pineapple rings, tomatoes, fried eggs and bacon. Finish off with the grated cheese.

Put the sandwich under the grill (broiler) until the cheese has melted and are starting to get brown.

Put the top half of the ciabatta on top of it all.

Enjoy!

Monday 27 July 2009

Recipe - Tomato and Chipotle Prawns


This is a fairly quick and easy way to get a tasty prawn dish on the table. There isn't much work involved but the end result is quite awesome.

I served it with rice but you could also serve it in tortillas/tacos or on its own as part of a tapas or buffet spread.

Adjust the hotness to your own liking but this is a dish that begs for a bit of a kick.

Save some of the coriander so you can use that for decoration when you plate the dish(es)

Ingredients (serves 2 - 4)
1 dried chipotle chili
Olive oil
1 onion, diced
1 clove of garlic, finely diced
500g passata
200g raw prawns, peeled and de-veined
4 tbsp coriander (cilantro), torn or chopped
Hot sauce to taste
Salt
Pepper

Method
Stem the chipotle and rehydrate it in warm water as per the instructions on the packaging. Once re hydrated, dice the chili.

Heat the olive oil on a low heat. Add the chili, onion and garlic and let that sweat on low heat for 5 - 10 minutes. Stir in the passata and bring it to a simmer. Let this simmer for another 5 - 10 minutes or until reduced to your liking.

Add hot sauce and seasoning to taste and then stir in the coriander. Stir in the prawns and let them cook for 2 - 3 minutes, or until cooked.

Enjoy!

Friday 24 July 2009

Recipe - Decadent Rock-n-Roll Sandwich


Yup, I know - this is wrong. So very wrong. Wrong on so many levels. But still, it had to be tried. If it was good enough for The King...

I honestly can't say what made me try this but being curious, stupid and in total contempt of my calorie intake is probably high up the list.

This was allegedly one of Elvis Presley's favourite sandwiches although I understand that his was made with a slight bit difference. I think that even his banana slices were fried in butter. It wouldn't surprise me if he had the entire sandwich battered and deep-fried too.

I used a Swedish spice mix called Grillkrydda (literally barbecue spice) as a dry rub for my chicken breast but you could use cajun spice or something similar instead.

Ok, let's head over and see how to clog our arteries in a true rock and roll way...

Ingredients (makes one sandwich)
1 bread roll, sub roll, baguette or similar
4 slices of smoked streaky bacon
1 boneless chicken breast
Dry rub (grillkrydda, cajun spice mix or similar)
1 ripe but still firm banana
Peanut butter, crunchy or smooth is up to you

Method
Fry the bacon until crispy, leave to cool on some kitchen towel. Dry rub the chicken breast and pan fry until done, alternatively pan fry to seal it and finish it off in the oven. Let the chicken rest until cool enough to handle. Once cool enough, slice it up.

Slice the bread lengthways, spread with a good layer of peanut butter. Top firstly with banana, then bacon and finally finish off with the sliced chicken.

Enjoy!

Thursday 23 July 2009

Recipe - Pork Mince Tostada


Link
Continuing down the route of maybe-not-so-authentic-but-quite-tasty Mexican dishes I stopped to make Tostadas. After what I can understand you can use most types of meat, and beans, to make Tostadas. Since I already had some pork mince in the fridge my choice was easy.

You could serve this dish already plated, or you could do it Taco style and have all the ingredients on in bowls etc the table and let people assemble your own.

If you do it a bit more stylish than what I did last night you could almost make mini-Tostadas to serve as starters for a Mexican themed dinner etc.

This is a dish you really can freestyle...

Ingredients (serves 2 - 4)
Olive oil
500g pork mince
1 large onion
300g - 500g jar of salsa (or homemade if you wish)

To serve (all optional)
Corn tortillas
Grated cheese
Sour Cream
Sliced pickled jalapenos
Lettuce, shredded
Spring onions, sliced

Method
Heat the oil in a frying pan on a medium heat.

Add the mince and the onion and fry until cooked through and all the liquids have disappeared. Add the salsa, bring to a simmer and let simmer until most (or all) of the liquids have disappeared and the mixture has a texture you like.

Either quickly heat the tortillas in a frying pan or in a oven. Pile some mince mixture on each one then top with the toppings of your choice.

Enjoy!

Wednesday 22 July 2009

Recipe - Ham and Refried Beans Torta


Here I go again, cooking something I've never tasted. What I did was read some book a while ago. I think it was either a Lansdale or a Burke, where the protagonists ate some tortas. That made me interested enough to Google some pictures and recipes so this is really a hotchpotch of a number of sources.

The risk with this is that although I really liked it, it might not be what I should expect when I get to try it 'for real'. The real thing might be disgusting and I might just have gotten lucky as well as tailoring it to my own taste and preferences. Never mind, I guess I'll find out one day.

Hopefully I didn't screw it up too badly, otherwise I'll end up being chased by the Council of Torta Makers or something like that.

Enough waffling, let's make some tortas...

Ingredients (makes 2 rolls)
2 bread rolls, I used ciabatta rolls
200g - 300g refried beans
2 slices of good quality smoked ham, torn or sliced
1 tomato sliced
Pickled sliced green jalapenos to taste, drained
2 slices Monterey Jack cheese
2 tbsp coriander (cilantro), roughly torn
2 tbsp sour cream
Shredded romaine lettuce

Method
Pre-heat the oven to 190c.

Slice the bread rolls lengthwise and hollow out both the top and bottom bit. Divide the refried beans between the two bottom halfs. Top with the ham, then the tomato slices. Add the jalapenos, top with cheese and then finish off with the coriander.

Put the tops on the bread rolls and wrap the tortas with aluminium foil. Pop them on a baking tray and hoik them into the oven for 10 minutes or until well warmed through.

Remove from the oven, carefully remove the aluminium foil. Take the tops off, add the sour cream and lettuce. Tops back on.

Enjoy!

Tuesday 21 July 2009

Recipe - Crispy Soy and Honey Pork Mince with Egg Noodles


This is another one of those recipes that I don't really know where it comes from but I keep cooking. It might be something I've found in cookbook or a magazine, or even something I've tried to recreate from restaurant meal somewhere. Never mind, it's nice and I like it.

As you can see there are not many ingredients to it and I prefer to keep it that way. If you want to freestyle it, go ahead - adding stuff like green peas etc would work really well.

It doesn't have any real spice added so use some nice chili sauce like Sriracha to kick it once you got it in front of you.

As the title says, it's supposed to be a bit crispy. Looking at the packaging for the pork mince I bought I saw that the recommended cooking method and time was to pan fry it for 40 minutes. Yes, you read that right. 40 minutes. They must be a) on drugs, b) mental, c) very afraid of lawsuits or d) all of the above.

Enough bitching about stupid labelling, let's have a look at the recipe.

Ingredients (serves 4)
4 nests of medium egg noodles
Olive oil
500g pork mince
1 - 2 cloves of garlic, finely chopped
4 spring onions, sliced (save some for decoration)
4 tbsp soy sauce
2 - 3 tbs runny honey
Fried crispy onions, optional for decoration

Method
Heat the olive oil in a frying pan on a medium to high heat. Add the mince and fry until it starts to change colour, add the garlic and spring onions. Keep frying until all liquid has evaporated and the mince starts to brown up.

Add the soy sauce and honey and keep frying whilst stirring all the time. Let the liquids cook in and allow the mince to crisp up properly.

In the meantime, cook the noodles according to the packaging.

Once the mince is crispy enough for your liking, serve it on top of the noodles. Top with some spring onions slices and crispy onions.

Enjoy!

Monday 20 July 2009

Recipe - Rose Petal Couscous Salad


Eating flowers? Am I crazy? Yes, a little bit I guess - but not in this case. There is a large number of flowers that you can eat the whole flower or parts of it.

Roses have a long tradition of being used in foods. Today you can find it in rose harissa and rose water for example.

If you are going to try this recipe, make sure that you wash the petals very carefully. Various roses have different strength of flavour so try a petal to try and judge how many you'll need in your salad.

This dish works just as well as a standalone salad served indvidually as it does as a larger shared salad at a barbecue for example. It compliments barbecued lamb really well.

Many thanks to Mrs T. for letting me use some of her beloved roses in the making of this dish. Update: I have been told that this particular rose is called Warm Welcome.

Let's hit the recipe and see how to cook this.

Ingredients (serves 4 - 6)
Couscous for 4
Vegetable stock
1 tbsp dried mint
1 can of chickpeas, drained and heated as per the tin
10 cm piece of cucumber - halved, deseeded and diced
4 medium tomatoes, deseeded and diced
6 dried apricots, diced
Rose petals, to taste
Rose bulbs, to decorate (optional)

Method
Cook the couscous as per the instructions of the packaging, replacing water with the vegetable stock and adding the dried mint.

Once the couscous is cooked, fluff it up with a fork. Add the rest of the ingredients and stir it all up well.

Serve in individual bowls or on a large communal plate. If you want to, decorate with some rose bulbs.

Enjoy!

Friday 17 July 2009

Funky Padron Peppers - Part 2


These little peppers really did taste nice, with the odd one out having a bit of a kick.

For once I didn't freestyle it, I actually followed the instructions on the packaging. Fry in olive oil for 3 minutes or so, until the skin on the peppers starts to blister. Hoik them into a bowl and sprinkle some salt over them. Job done.

Just peppers on their own would have been a bit too one-dimensional so I decided to add in some other small bits and pieces.

I ended up with a little platter consisting of the following: Padron peppers, chili stuffed olives, manchego cheese, Salchichon Ibérico, Chorizon Ibérico and Lomo Ibérico.

If you add some nice bread to that you'll find yourself with a nice (almost) non-cook dinner that you can enjoy in a nice and slow tempo.

I know for a fact that you can find these Padron Peppers in Waitrose but I'm sure there are some other shops around that stock them too.

Thursday 16 July 2009

Funky Padron Peppers


I found these funky looking Padron Peppers in my local supermarket. I've never seen or heard about them before, that's probably just me being ignorant as usual, so I had to grab a bag of them.

It says "1 in 30 has a kick!" on the packaging so I guess I'll have to verify that. I'll also verify if said kick is enough to warrant the image of a angry kicking bull on the front or if it should have been a slightly agitated wax worm instead.

The packaging says to fry them in olive oil for about 3 minutes or until the skin starts to blister, hopefully on the peppers. Once that's done, pop them into a bowl and sprinkle some salt over them.

I'll see if I can find any alternative ways of cooking them or if that is it. Once cooked and tried I'll post my findings up here.

In the meantime if anyone reading this knows anything about these little peppers, drop me a comment and let me know!

Wednesday 15 July 2009

Recipe - Bourbon Glazed Pork Tenderloin


A very good friend of mine had some business down here in 'The Don' the other day so he checked if he could crash at mine. That was of course no problem.

After being told that Hotel Mikey operates strictly on a BYO basis he turned up with a mattress, duvet and a very nice bottle of wine. Good lad!

Since I knew that the risk of us going down the pub was off the scale I figured that we needed something to line our stomachs with. Bourbon glazed pork tenderloin sounded like a good idea in theory. Thankfully it turned out just that way in reality too.

I served it with some sweet potato mash and a mayo-free coleslaw, a combination that worked out really well.

Just a couple of pointers on this recipe. Using a silicone brush and lining the baking tray with tinfoil is a must. The glaze is stickier than Russel Brand's bedsheets.

After that nasty mental image, over to the recipe...

Ingredients (serves 2)
500g pork tenderloin (pork fillet), trimmed and cut in two
3 tbsp bourbon (JD preferably)
3 tbsp ketchup
3 tbsp soy sauce
4 tbsp brown sugar
1 tsp garlic powder
1/2 tsp ground ginger
1/2 tsp smoked paprika

Method
Pre-heat the oven to 220c.

Combine everything besides the tenderloin in a pan. Bring this to a simmer and let it simmer for about 5 minutes, stirring, until nice and thick.

Put the tenderloin on tinfoil on a baking sheet. Brush liberally with the glaze and put it all into the oven.

Cook for 25 - 30 minutes or until done. About half way through the cooking, remove the baking sheet from the oven and brush the tenderloins with some more glaze before returning them to the oven.

Once done, remove from the oven and let the tenderloins rest for 5 - 10 minutes before slicing them.

Enjoy!

Monday 13 July 2009

Recipe - Sausage Pasta Bake


Time for a recipe that uses some leftovers again...

I ended up having some nice pork sausages left in my fridge and needed to come up with some way of using them. I was in the mood for some pasta as well so that set the parameters.

I guess I could have just have fried them as they were and had them with some pasta and ketchup. That would have been a tad bit boring though, so this is what I did instead...

Ingredients (serves 2)
3 good quality pork sausages
2 portions cooked macaroni (or any other pasta you fancy)
1 onion, diced
1 tbsp butter
1.5 tbsp plain flour
250 ml milk
200 ml grated cheese
Baby plum tomatoes, halved lenghtways
Salt
Pepper

Method
Pre-heat the oven to 225c.

Pour the macaroni into the bottom of a oven safe dish and top with 1/3 of the cheese.

Open the sausage casings and squeeze out the contents into a hot non-stick frying pan. Add in the onion and fry until the sausage no longer is pink and starts to get browned. Make sure to stir well and get the sausage split up into small pieces. Pour this mixture on top of the macaroni and top with another 1/3 of the cheese.

Melt the butter in a pot, stir in the flour and pour in the milk. Bring to the boil and reduce to a simmer. Let it simmer for about 5 minutes. Season to taste.

Pour the sauce on top of the macaroni and sausages, add in the tomatoes - cut side down. Finish off with the last 1/3 of cheese.

Put this in the oven for about 15 minutes or until golden brown and piping hot all the way through.

Enjoy!

Friday 10 July 2009

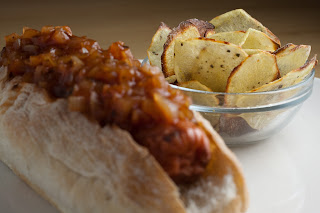
Recipe - Hot Dogs with Red Hot Onion Sauce and Ovenbaked Potato Chips


These days hamburgers seems to get the luxury treatment everywhere. The poor old hot dog seems to have been forgotten amongst all the hubbub surrounding the hamburgers. Not so on this blog though.

The Red Hot Onion Sauce in this post is a real winner and it works with almost any grilled or barbecued meat. As always, freestyle it to suit you and your palate. With these quantities it will have a bit of a bite but it won't make your head explode. If you want that, add more chili sauce!

The potato chips are dead easy to make and can be freestyled to no end. Just add some different spices to give them some interesting flavours. Just to give you an indication of the quantities, using the 2mm slicer on my Magimix I got enough slices to cover about one and a half baking sheet from one decently sized potato.

Time for the recipe..

Ingredients
Potato Chips
1 potato, peeled
Olive oil
Salt
Pepper

Red Hot Onion Sauce
2 yellow onions, diced
125 ml ketchup
125 ml water
3 tbsp soft brown sugar
1 tbsp Sriracha Chili Sauce (or any hot sauce really)
1 tsp Worchestershire sauce
1 tsp Oregano
Salt
Pepper

Hot Dogs
Hot Dogs
Hot Dog Buns

Method
Potato chips
Pre-heat the oven to 220c.

Slice the potato as thinly as you can, using a mandolin or a food processor. Put the potato slices on some parchment paper on a baking tray. Brush with olive oil and scatter some salt and pepper on top.

Pop the baking tray into the oven until the chips are nice and crisp, this normally takes about 10 minutes. Rotate the baking tray if needed during the cooking time.

Remove from the oven and allow the chips to cool on a cooling rack.

Red Hot Onion Sauce
Combine all the ingredients in a sauce pan. Bring it to a boil and reduce to a simmer. Let this simmer until it starts to thicken up quite a bit, normally around 20 - 25 minutes. Remove from the heat and allow it to cool down, bearing in mind that it will thicken some more during this process.

Re-heat when you are ready to serve. This sauce lasts for about a week in the fridge.

Hot Dogs
Fry, grill, oven bake or barbecue the hot dogs to your liking. Pop in a bun and spoon some sauce over.

Enjoy!

Thursday 9 July 2009

Recipe - Creamy Garlic Potato Gratins with a Rosemary twist


As side dishes go, this is one of my favourites. I think I can trace it back to something my parents use to cook now and then and it has evolved from there.

Depending on the mood I can add and subtract things to this recipe but what I'm listing here is the core recipe. Use this as a base and then freestyle it as you wish.

I think it's quite nice to cook and serve it in individual ramekins like this, but you can just as easily make one large dish if you want to. Just to give you an idea, the ramekins I used this time has a diameter of 10cm and holds about 350ml.

At first I thought that the only reason you should pour the milk and cream mixture over the potatoes even before putting them into the ramekins was to infuse flavour. It wasn't until quite late I realised that by doing that you stop the potatoes from discolouring.

When you cook this, if the gratins goes brown on top too early - just pop some tinfoil over them.

Let's head over to the recipe....

Ingredients (makes about 4 ramekins)
250 ml milk (go full-fat)
400 ml double cream
2 garlic cloves, peeled and smashed with the side of your knife
1 sprig of fresh rosemary
Salt
Pepper
4 large-ish potatoes (I used Desiree)

Method
Pre-heat the oven to 180c.

Pour the milk and cream into a pan and add in the garlic cloves and rosemary. Season well and bring the pan to a simmer. Once it's simmering, turn off the heat and allow the mixture to cool down.

Peel the potatoes and either use a mandolin or a food processor to slice them into 2 - 4 mm slices. If you don't have any of the previous, use your knife and try to be quite exact.

Put the potato slices in a bowl and pour over the milk and cream mixture. Fish out the rosemary and garlic cloves. Give the bowl a good shake or two to make sure to cover all the potato slices.

Now you can start lining the ramekins with layers of potatoes. Spoon over a teaspoon or two of the milk and cream mixture for every two or so layer that you make. Keep doing this until you've used up all the potatoes. If there's anything left of the milk and cream mixture - divide it up evenly and pour it on top of the ramekins.

Put the ramekins onto a baking sheet and pop them into the oven for about 45 minutes. You should be able to push a knife into the gratins with no real resistance once they're cooked properly.

Enjoy!

Wednesday 8 July 2009

Recipe - Curried Lamb Filo Parcels served with Broad Bean and Yoghurt Couscous


Back from holiday and I finally got to use my Magimix for the first time. This recipe, minus the couscous bit, was stolen from the recipe book that came with the Magimix. Needless to say, I freestyled the recipe to suit me.

If you don't have a food processor or just can't be bothered with all the kerfuffle, just use some lamb mince and mash the banana by hand etc.

The broad bean and yoghurt couscous is an idea that I borrowed from Lido Bristol, a most excellent restaurant that I visited during my time off. I didn't take any pictures during my visit, but I might end up posting a quick review anyways.

Time for the recipe

Ingredients (makes 4 parcels so will serve 2 - 4)
Lamb Filo Parcels
300g diced lamb leg
2 - 4 tsp curry powder
1 tsp paprika
1 tsp ground cumin
1 banana, sliced
1 egg + 1 egg yolk
2 garlic cloves, peeled
Salt
Pepper
Olive oil
4 sheets of filo pastry

Couscous
Couscous
Vegetable stock
1 can of Broad Beans
Low fat yoghurt

Method
Lamb Filo Parcels
Put the lamb, curry powder, paprika and cumin in a freezer bag and make sure to mix well. Pop the bag into the fridge for at least 2 hours, preferably over night.

Once marinated enough, remove the bag from the fridge and let it come to room temperature.

Pre-heat the oven to 180c.

Put the lamb and the garlic in the large bowl of your food processor and blend with the metal blade for 45 seconds. Add the banana and pulse 2 to 3 times and then add the egg. Season with salt and pepper and blend for 20 seconds.

Heat some olive oil in a frying pan. Fry the lamb mixture for about 5 minutes, stirring now and then. Check the seasoning as you fry.

Once fried, allow it to cool a bit.

Divide up the lamb mixture into four equal parts. Spoon one part onto the centre of a filo sheet, fold together to form a small parcel. Repeat with the rest of the sheets.

Put the parcels on a baking tray that has been lined with baking parchment. Brush the parcels with beaten egg yolk and pop them in the oven for about 15 minutes.

Couscous
Prepare the couscous as per the instructions on the packaging, replacing water with vegetable stock.

Once prepared, heat the broad beans as per the instructions on the can and drain.

Mix in the beans and add tablespoons of yoghurt until the couscous has a nice and saturated feel to it. Just make sure not to drown it in yoghurt.

Enjoy!

Friday 3 July 2009

Pimp my Magimix


I'm off on a short holiday at the moment and didn't have time to prepare a 'proper' post for today.

Instead you'll have to admire my latest toy. A great addition to my arsenal of kitchen appliances. I haven't even had time to use it before I head off for holiday. However, when I come back I'm looking forward to getting lots of use out of it.

Oh yeah, the flames are not standard and you can't add them as an optional extra from Magimix either. ;)

Until next week...

Thursday 2 July 2009

Recipe - Pork Kebabs with Chickpea Salad


I have to admit that this chickpea salad recipe is stolen, and somewhat modified, from a post at Angry Asian Creations. I saw that recipe a while back and liked it so much that I had to try it. Being me, I did freestyle it a bit so it has changed a bit from its original format.

If you use tinned chickpeas you can get away with not having to boil the chickpeas, something that can be useful in the current heatwave.

I served it with some pork kebabs but tell you what, it could work on its own during a hot summer day. Give it a go and see what you think.

Many thanks to Lan over at Angry Asian Creations for the inspiration!

Ingredients (makes enough for two or so)
Chickpea salad
100g uncooked chickpeas
6 tbsp low fat natural yoghurt
1/2 tsp paprika
1/2 tsp ground allspice
1/2 tsp ground cumin
1/2 red apple, cored and finely diced
1/2 onion, diced
A couple of mint leaves, chopped

Pork kebabs
Pork meat, diced and marinated
Red pepper, cut into large dice
Yellow pepper, cut into large dice
Onion, cut into wedges
Salt
Pepper
Olive oil

Method
Soak the chickpeas over night and cook them according to the instructions on the packaging. Once cooked, let them cool until they reach room temperature.

Mix all the ingredients for the chickpea salad well in a big bowl. Cover with clingfilm and put in the fridge for at least an hour or so to let the flavours mix. Remove from the fridge half an hour (or a bit earlier if you want it a bit lees cool) before serving.

For the pork kebabs, skewer the ingredients on wooden kebab sticks that you have soaked in water beforehand. Season and lightly oil with olive oil. Cook on a barbecue or under the grill until done to your liking.

Enjoy!

Wednesday 1 July 2009

Recipe - Smoked Mackerel Salad


Greetings from tropical Oxfordshire.

As you might understand from that start, it's still hot as hell here at the moment. Too hot for warm food so I'm continuing with my salads.

This is one is (almost) just a matter of assembling cold bits and pieces into a nice and chilled meal. The only exception is that you will have to boil your potatoes.

I ate this cold but it works as a warm salad in winter too. Just assemble it once the potatoes are warm enough to handle and it will become a winter warmer instead of a summer cooler.

As always, just add and subtract ingredients to make this dish into something you like. You guessed it, freestyle it! ;)

You might notice that I'm not listing salt and pepper in the ingredient list - that is because I used peppered smoked mackerel which are salted and peppered well from the start.

Ingredients
Mixed salad
Boiled new potatoes, halved or quartered
Smoked mackerel, flaked (watch out for any remaining bones)
Radishes, quartered
Spring onions, sliced
Creme Fraiche
Lemon Juice

Method
Put the salad on a plate.

Put the potatoes, mackerel, radishes and spring onion together in a bowl. Mix in Creme Fraiche, one spoon at a time, until it's all coated but not drowning in Creme Fraiche. Add lemon juice to taste.

Add the mix on top of the salad.

Enjoy!