Tuesday, 23 February 2010

Recipe - Raspberry and Coconut slice


The baking madness continues...

I'm sure that my colleagues love this sudden foray into baking since they're the ones who get to sample the goods. The thing I would like to know is how you readers feel about it? I'm still so new to it that I cannot do my normal freestyling and make up recipes on my own. The recipes will be coming from various cookbooks, magazines and so on.

Are you readers still interested and willing to read the recipes even if they're not my own and you could find them if you bought the same cookbooks? I will never take the credit for a recipe that's not mine, I'll always give full credit to where I found it - if I still have that information.

Please use the comment field if you feel like it. Let me know what you think, should I post some baking stuff too - even if the recipes can be found elsewhere?

This recipe comes from a cookbook called Traybakes & Slices that are published by The Australian Women's Weekly. They publish a large number of cookbooks and I must say that I really like what they do. Nice pictures, great recipes that are easy to follow and the cookbooks are normally very decently priced.

Ok, on to the recipe...

Ingredients
90g butter, softened
110g caster sugar
1 egg
35g self-raising flour
100g plain flour
1 tbsp custard powder
220g raspberry jam

Coconut topping
160g desiccated coconut
55g caster sugar
2 eggs, beaten lightly

Method
Pre-heat the oven to 180c(160c fan). Line a 20cm x 30cm shallow baking tin with parchment paper.

Beat butter, sugar and egg with your mixer until light and fluffy. Stir in sifted flours and custard powder. Spread this mixture in the tin. Cover with jam.

Combine all the ingredients for the coconut topping in another bowl and spread/sprinkle on top of the jam.

Bake for about 40 minutes and let cool in tin before slicing.
Enjoy!

Friday, 19 February 2010

Recipe - Very Simple Bread


If you have read this blog for some time you have probably noticed that I very rarely, if ever, post anything that is even slightly related to baking. That might change now. Followers on Twitter should have seen some posts about my latest kitchen toy, a KitchenAid bench mixer.

A KitchenAid is a bit of an investment so I have had to find ways of using it to justify the purchase. :)

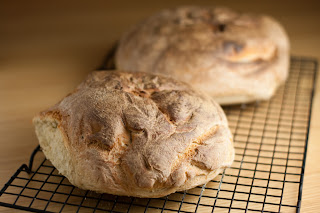
This was one of my first attempts at baking something using the KitchenAid to help me in the preparation. A very quick and easy bread to make that tasted very good. It might just have been beginners luck. :)

I can tell you that I'm well outside my comfort zone when I'm in the middle of my attempts of baking. Something that I think is a good thing, it's always good to try and push yourself to learn new stuff. As long as no one is there to tell me what I'm doing wrong I should hopefully be able to learn this baking malarkey as I go along at my own pace.

Enough kneading of the words, lets hit the recipe...


Ingredients (makes two loaves)
600g + 300g plain flour
2 x 7g packages of dry yeast
1 tbsp salt
2 tbsp sugar
500ml hot water (about 50c)

Method
Put 400g of flour, the yeast, salt and sugar in the KitchenAid's bowl and mix together well with a fork. Pour in the water and start mixing on speed 2 with the dough hook for about a minute or so. Whilst you keep it at speed 2, slowly add the remaining flour. The dough should start balling up around the dough hook by now.

Increase the speed to 4 and keep going for at least 3 minutes or until the dough is smooth and elastic. Pour some olive oil into a bowl, turn the dough into that bowl. Make sure to turn the dough around so all of it gets oiled. Cover and leave for about 20 minutes or so - or until it has doubled in size.

Split the dough into two and make two round loaves out it. Put them onto a baking sheet with parchment paper on. Brush the loaves with water.

Position the baking sheet in the middle of the oven with a pan of water on the shelf below. Turn the heat onto 210c (190c fan) and bake for about 45 minutes, rotating the pan about half way through. The loafs are done when they are golden brown and sound a bit hollow when you tap their bottoms.

Remove from the baking sheet and allow them to cool down on a cooling rack.

Enjoy!

Tuesday, 16 February 2010

Recipe - Chicken breast wrapped in Pancetta with Sage


To be honest, I think this is one of the tastiest dishes that I have cooked for a long time.

Normally you run the risk of ending up with a dry chicken breast but not when you cook it this way. The pancetta takes the hit from the heat whilst the chicken breast cooks to perfection and stays moist and nice.

This is definitely a dish I will pull out if I need to cook to impress a bit. As you can see from the picture I served it with gnocchi and green beans the first time I cooked it.

I've cooked it again since the time of that photo and that time I served it with creamy mash and maple syrup glazed baby carrots and a sauce made from deglazing the pan with just water and lemon juice (pour off all the fat first).

I've actually ended up freezing the rolls for a couple of days both times I've cooked this. Just remove it from the freezer the evening before cooking it and let it defrost in the fridge. From that, just follow the recipe.

Give this dish a go, I'm fairly certain that you won't regret it.

Ok, enough singing its praises, it is starting to blush, time to head over to the recipe. I haven't really given any specific measurements, use enough to make each parcel.

Ingredients (per person)
1 skinless chicken breast
Pancetta
Fresh sage leaves
Salt
Pepper
Vegetable oil


Method
Put the pancetta on a cutting board, overlapping slightly lengthwise, until you got a wide enough 'plate' to fit the chicken breast lying horizontally. Space out sage leaves proportionally on the pancetta to taste.

Pop the chicken breast onto the pancetta, season well, and roll the pancetta tightly around the chicken. Now pull out a good lenght of cling film and put the chicken on the short end of it. Start rolling the chicken tightly and then roll it thoroughly until you got a nice and round 'sausage' that is uniformly round. Repeat this for each portion. Refrigerate for at least a couple of hours but preferably over night.

Remove the chicken breasts from the fridge about 30 minutes before cooking. On medium heat, heat some oil in a pan that can house all the chicken breasts comfortable. Remove the cling film and put the chicken rolls in the pan, seam down, and lower the heat to medium low.

Cook for about 20 minutes, turning a quarter every 2 minutes or so. When the time is up, remove the pan from the heat and flip the chicken rolls half a turn. Let it sit for 2 - 3 minutes, flip again and let sit for another 2 - 3 minutes.

Remove from the pan, use some kitchen towel to suck up extra fat and slice the chicken into 2 - 3 cm slices. Arrange on a plate and serve with sides of your choice.

Enjoy!

Tuesday, 9 February 2010

Recipe - Maple Syrup roast Crown of Duck


The other day when I was walking around in the supermarket I noticed that they had a special on Crown of Duck. Not really knowing what that was I thought I'd give it a go.

It turns out that a Crown of Duck is basically a duck someone stolen the legs from. When you cook it you get two breasts and that's about it. Some people might see that as a little bit of a waste of good duck space but for me it worked.

I got a fairly big and filling dinner out of one of the breasts and the other one I converted into wraps for lunch the day after. All I did was to slice up the breast, slap that onto some wraps and then add julienned leek and cucumber. Finish off with some hoisin sauce and wrap it up. Simples.

Adjust the times below to suit you and your bloodlust. The times below worked fine for a duck weighing in just over 900g and kept the meat still juicy without oozing blood.

Over to the, very short, recipe....


Ingredients
1 Crown of Duck
Salt
Pepper, freshly ground
Garlic cloves to taste
Maple suryp

Method
Pre-heat the oven to 200c.

Score the skin several times over each breast. Massage in salt and pepper, making sure to penetrate the scores. Chuck a couple of garlic cloves into the cavity.

Pop the bird onto a roasting grill in a roasting tray. Cook in the oven for 50 - 55 minutes, rotating the tray halfway through.

Remove from the oven and pour over 2 - 3 tbsp of maple syrup. Return to the oven for another 10 - 15 minutes. Rotate the tray halfway through again if you feel like it.

Remove from the oven. Allow to rest for 5 - 10 minutes before carving.

Enjoy!

Thursday, 4 February 2010

Recipe, Smoked Chicken, Prawn and Avacado Salad


A couple of Sundays ago we went to the Beetle & Wedge for a very enjoyable Sunday lunch. It was the first time I went there but I will make sure to come back again. I can only imagine how great the place would be in Summer, being that close to the river and everything.

One of our party went for the 'Avacado Salad, Smoked Chicken & Prawns' salad. I didn't regret my selection of "Beef Casserole, Baby Onions, Bacon & Button Mushrooms" at all but the salad looked so good that I wanted to see if I could recreate it myself.

I couldn't find any smoked chicken at short notice so I used my old method of poaching and had quite a lot of smoked paprika in the poaching liquid. That gave quite a strong smoked flavour which made the recipe work.

If you look at their menu you'll see that this can be ordered either as a starter or as a main. The ingredients below should make about 2 starters or one quite generous main serving.

Ok, let's make some chicken salad...


Ingredients (Enough for 2 starters or 1 main)
1 smoked chicken breast, diced
1/2 avacado, diced
A handful of cooked prawns, chopped
2 spring onions (scallions), finely sliced
1 - 2 tbsp finely diced dill + sprigs to garnish
Lime juice
Mayonnaise
Salt
Pepper
Salad leaves, to garnish (I used gem lettuce)

Method
Mix the chicken, avacado, prawns, spring onions and dill in a bowl. Squirt over some lime juice to keep the avacado from going brown. Stir in enough mayonnaise to coat it all, but don't make it too wet. Season to taste.

Decorate the plate with the salad leaves and put the salad mixture onto the plate (I was a bit faffy and used a cooking ring).

Enjoy!

Monday, 1 February 2010

Recipe - Low and Slow Game Casserole


I'm quite happy to see more and more interesting and unusual cuts of meat in my local Waitrose. It seems that they are adding more game to their shelves as well, something I think is really good.

The other day they had a bit of a discount on Game Casserole packs. These packs contained diced pheasant, pigeon parttridge and mallard. The label stated that I could find cooking instructions on the other side. I guess that is true, they were just not very helpful.

All they basically said was to brown the meat, add some vegetables and stock and then cook it in the oven. The only measurements etc that was given was the temperature for the oven and the time needed to cook.

Needless to say, I wasn't too happy or impressed with those instructions. What I did was to look through some of my recipe books and then I also used some Google-Fu.

Then I took the various recipes I could find that I liked and mixed and matched things to get something to work with. This is what I came up with, you could use it as a good start for your own stew - just freestyle it to suit you and your taste.

Ingredients (serves 4)
2 x 340g Game Casserole packs
Salt
Pepper
Butter
4 slices of streaky bacon, cut into pieces
1 carrot, peeled and sliced
12 - 14 shallots, peeled and halved
4 sprigs of fresh thyme
20g dried porcini mushrooms, re-hydrated as per the instructions 
250 ml red wine
300 ml chicken stock

3 - 4 tbsp chopped curly leaf parsley.

Method
Pre-heat the oven to 160c.

Melt the butter on a medium heat in a oven safe casserole with a lid. Season the game well. Fry the game in batches until well browned on all sides. As it gets done, remove to a plate.

Once all the game has been fried and removed, add in the bacon, shallots and carrots and fry whilst stirring for about 5 minutes. Add in the thyme, porcini mushrooms, wine and chicken stock. Bring to a simmer and then remove from the heat.

Put the lid on the casserole and pop it into the oven. Cook in the oven for about 90 minutes or until cooked and well tender.

Once cooked, remove from the oven and stir in the parsley.

Serve with rice, mashed potato or as I did - with polenta fries.


Enjoy!